Руководство по калибру проводов автомобильной аудиосистемы с таблицами
Руководство по калибру проводов автомобильной аудиосистемы с таблицами
При обновлении автомобильной стереосистемы важно правильно подобрать сечение проводов, и, несмотря на множество факторов, это руководство даст вам достаточно знаний, чтобы понять, какой размер выбрать.
Будь то усилитель, сабвуфер, динамики или другие компоненты, правильный размер провода имеет решающее значение для получения максимальной отдачи от вашего нового оборудования.
Неправильный подход не только повлияет на звучание вашей музыки, но и может повредить аудиооборудование, электропроводку автомобиля, а в худшем случае вы даже можете вызвать пожар в автомобиле.
В этой статье мы рассмотрим основные типы проводки автомобильной аудиотехники и диаметр проводов разного размера, необходимый для каждого из них. Для каждого пояснения есть диаграмма калибра проволоки, которая должна дать вам достаточно точное представление о том, какой калибр вам нужен.
Американский калибр проводов (AWG)
В большинстве стран мира используется американский калибр проводов (AWG), который является стандартной мерой диаметра электрических проводников в США. Он основан на количестве штампов, изначально необходимых для вытягивания меди до требуемого размера. Таким образом, чем меньше число, тем толще провод.
AWG был впервые представлен в 1857 году в качестве стандарта для замены различных измерений, используемых разными производителями. Самый большой размер провода – 0 000 AWG, а самый маленький стандартный размер – 40 AWG.
Это используется как для одножильных, так и для многожильных проводов, хотя многожильные медные провода могут быть немного более объемными, чем одножильные провода, даже если они имеют одинаковое сечение. Тем не менее, использование калибра проводов AWG приведет к тому же результату.
Существует много споров о том, улучшает ли качество звука большее количество жил, но на самом деле речь идет не о большем количестве жил провода, а о выборе правильного сечения провода.
Убедитесь, что вы правильно закрепили проводные соединения
Использование направляющей для проводов необходимо для получения правильного размера, но надежное соединение проводов также имеет решающее значение при установке любого аудиооборудования, поскольку это обеспечит хорошее и надежное соединение.
Плохое соединение может быстро ослабнуть, а если это произойдет, это может вызвать много проблем для вашей стереосистемы и головную боль, которая вам не нужна.
Существует множество различных типов разъемов, и некоторые из них лучше подходят для определенной электропроводки, но какой бы разъем вы ни использовали, убедитесь, что у вас надежное соединение.
Обжимные соединители достаточно хороши. По сути, это электрический разъем, используемый для оконцевания или соединения многожильных проводов. Провод войдет в разъем, и пока вы обжимаете его обжимными клещами, вы получите надежное сцепление.
Пайка — еще один отличный способ защитить электропроводку. Это немного больше работы, но при условии, что все сделано правильно и с использованием правильного паяльного оборудования, это самый безопасный способ соединения проводов и аудиооборудования.
Пайка проводов даст вам наилучшее соединение, но убедитесь, что вы делаете работу правильно. Если вы никогда не делали этого раньше, я бы порекомендовал приобрести обжимные соединители, потому что плохо спаянные соединения могут привести ко многим проблемам.
После того, как вы подключили провода, всегда полезно завернуть соединения в термоусадочную пленку. Это защитит их от пыли и грязи и укрепит соединение, гарантируя, что ваши провода никогда не разорвутся.
Итак, теперь у вас есть вся информация о стандарте AWG и вы получаете наилучшее соединение для вашей электропроводки, пришло время взглянуть на руководство по калибру проводов для каждой установки.
Подключения заземления
Заземление необходимо для всех электрических устройств, установленных в автомобиле. Земля — это отрицательное электрическое соединение, которое питает устройство, и в основном оно будет подключено к шасси автомобиля. Плохое заземление, вероятно, является наиболее распространенной причиной проблем с автомобильной аудиосистемой, поэтому убедитесь, что вы все сделали правильно.
Провода заземления должны быть надежно закреплены на чистом неокрашенном металле или в специальных точках заземления на шасси. Отличное место для подключения заземления — под болтом ремня безопасности, так как это обеспечит надежное соединение с шасси.
Заземляющие провода должны быть подходящего сечения, необходимого для применения. Итак, если вы устанавливаете усилитель мощностью 600 Вт, сечение заземляющего провода должно обеспечивать его питание.
Как правило, ваш заземляющий провод будет того же размера, что и кабель питания, о котором я расскажу чуть ниже, поэтому для выбора правильного сечения провода для заземления используйте размер кабеля питания.
Подключение усилителя в автомобиле
Ваш усилитель является одним из, если не самым энергоемким, аудиооборудованием, и чем больше среднеквадратичное значение может выдать ваш усилитель, тем больший кабель питания вам понадобится.
Если вы протянете слишком тонкий провод питания, ваш усилитель может быстро выйти из строя, поэтому убедитесь, что вы все сделали правильно.
To work out the wire gauge needed for your power cable you need an idea of how much current your amp will try to consume, and on how long the wiring run from battery to amplifier will be.
To work out the approximate amperes of your amplifier, you need to multiply the number of channels by the RMS per channel. If you have more than one amp, you need to add them all together, and divide that by the efficiency and then the voltage.
There are two common types of amplifiers:D Class and A/B Class. You never get 100% efficiency out your amp, so it throws another spanner in the works. Generally, Class D amps are more efficient and you should get around 75% efficiency, whereas with an A/B amp you will get around 50% efficiency.
So, to work it out:If you have a Class D amplifier, you need the total RMS divided by 0.75 Amp Efficiency divided by 13.8 Volts to get your Current Draw in Amperes.
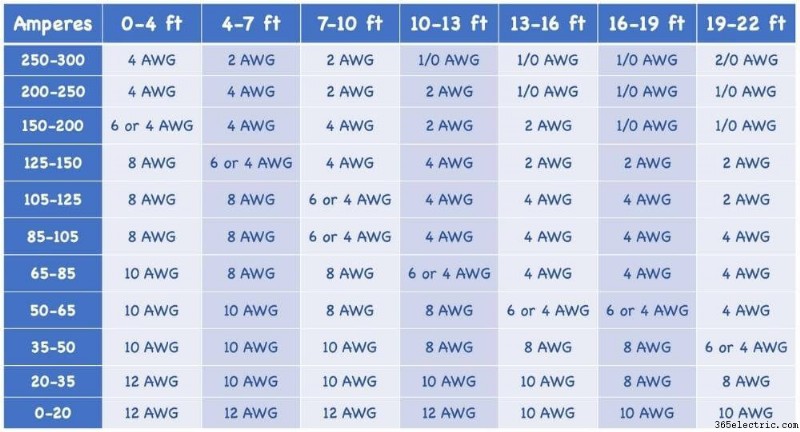
So, if you have a 600W RMS Class D amp, your math will be 600/0.75/13.8 =57.9710145, which rounded up is 58 amperes.
As you can see in the wire gauge chart below, the gauge needed for an 8 foot power cable would be 8 gauge.
If you have an A/B Class, you need the total RMS divided by 0.50 Amp Efficiency divided by 13.8 Volts to get your Current Draw in Amperes.
So, if you have a 600W amp, your math will be:600/0.5/13.8 =86.956521, which I’d round up to 87 amperes.
As you can see in the wire gauge guide above, the AWG I’d need for a power cable of the same length would be either 6- or 4 gauge wire. I would always round down and go for the bigger wire so I’d get a 4 gauge power cable. Quite a difference from the D Class amp above!
Other Wires Running From Amplifier to Receiver
You can get amp wiring kits with all the wires and connectors in, which are a good idea as you can keep hold of them in case you need to replace any wires further down the line.
All amplifiers will come with a Remote Turn-on Wire, but if you have to replace it, you should get an 18 AWG blue wire.
For the RCA Jacks, you will just need to replace them with some standard RCA male-to-male jacks. These usually come between 22 gauge to 18 gauge, and the more powerful your amplifier is, the better it is to go with the bigger 18 gauge
Speaker Wires
Running speaker wires, whether it’s directly from your head unit or from your amplifier, allows your speakers to receive the audio signal, so they can reproduce those amazing sounds we all love to drive along to.
Speaker wires are typically 2 separate stranded wires molded together, with one strand being the positive + and the other strand being the negative – strand.
There are many different qualities of speaker wire, so it’s a necessity that you get the best you can afford, because cheaping out on speaker wires, will cause you problems and you won’t get the best out of your audio equipment.
Some cheaper wires that claim to be a certain gauge might not be, and instead you’ll be buying more plastic sleeve than wire.
Depending on the speakers you have will determine the wire gauge you need, and below in the wire gauge chart you can work out what is best for you.
Factory speakers will run on pretty much any size wire, as the power demands are minimal. But of course, most people into audio upgrade their car speakers, so getting the right size wire is necessary for you speakers and subwoofers.
Aftermarket speakers need more power, so the electrical wiring that drives the signal to them needs to be bigger than factory speakers.
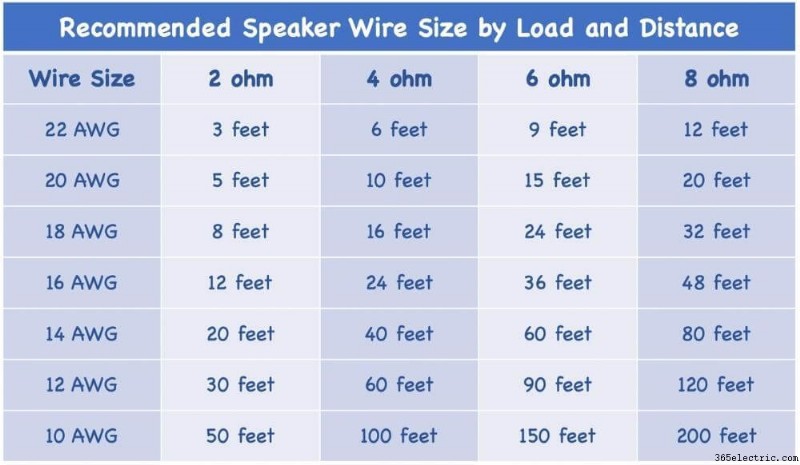
Speaker wires are usually between 18-14 gauge, but to work out the size for yours, you should know the Impedance and distance.
Looking at the chart above:If you are running speakers at 4 ohms and the distance needed is 20 feet, then you are between 18 and 16 AWG. In this case I would always go for the bigger wire, so go for 16 gauge.
For subwoofers the speaker wire will tend to be a bit bigger. Usually you will need as big as 14-12 AWG, but the calculations are the same as the speaker wires on the wire gauge chart above.
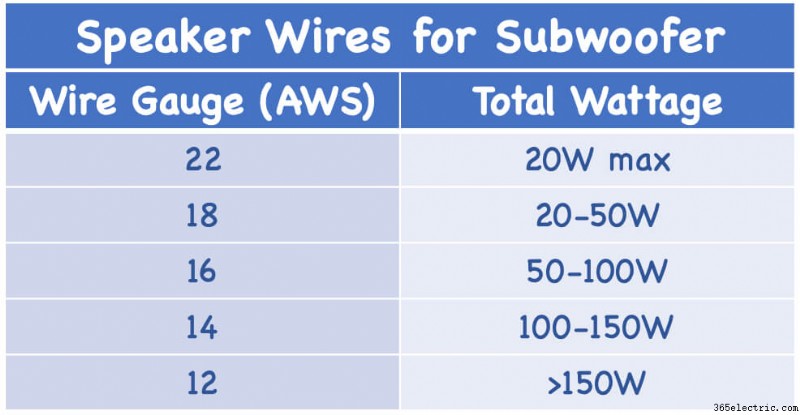
Although another general rule of thumb is to work out its total wattage, and looking at the wire gauge chart here with RMS wattage, you can just go for that size wire.
You can use both wire gauge guides to come up with the wire size you need, but generally speaking you should need something between 16- and 12 gauge speaker wire for your subwoofer. And always go for the bigger wire if you’re getting mixed results.
Crossover Wiring
Using a crossover gives you more control over your sound system, but many people get confused with the electrical wiring.
Crossovers need 12v of power, which many people think it needs a thicker gauge wire, but because crossover demands less current, as a general guide 18 gauge wire is usually fine.
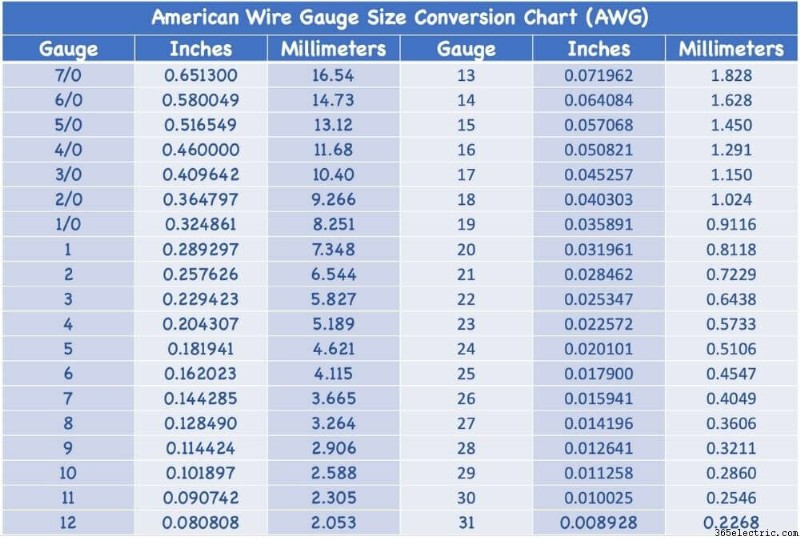
Wire Conversion Chart
All measurements in the wire gauge charts above are imperial, but for anyone who works in metric (most of the world), please find the wire gauge chart below for converting inches to millimeters useful.
Other FAQs About Electrical Wiring Gauge
Why do you need different gauge for different wire lengths?
Basically, resistance increases the longer electrical current has to travel. This is because as it’s travelling the electrical resistance builds up, so the longer it is, the more resistance. And the electrical current can only travel so far before there’s a voltage drop, which is why you need a bigger power cable.
What happens if I go too small?
If you get too small a size wire, it depends, but it’s not good. You might be lucky and just temporarily lessen the quality of of your soundstage, or you could damage your equipment and even set your car on fire.
The problem is determined by the wrong wires you install. That’s why it’s always necessary to know the correct size you need by looking at wire gauge guides.
What happens if If I go too big?
If you go too big, don’t worry too much as it won’t damage anything. But of course if you go too big it will cost you unnecessary outlay as the bigger wires are more expensive.
Also, the bigger the wire, the more room it will take up and the harder it is to bend. So, try and get it right, but too big is definitely better than too small.
What happens if my wires are too long?
When you buy the wires, it’s always a good idea to buy more than enough. However, when you install your audio equipment, don’t leave too much wire hanging out or even rolled behind something, even if it’s hidden.
Cut the wire at the appropriate length, because longer wires add unnecessary resistance and can create impedance. It also leaves your car looking messy.
Choosing The Right Size Wire for The Right Audio Equipment
So there you have it, a wire gauge guide for all the important electrical wiring in your car stereo system.
All the different wire sizes can be confusing, but looking at the charts or even a wire gauge calculator will give you a better understanding of which size to get.
All wiring is important, but pay particular attention to your power leads and do the math correctly for the total amperage and distance, because this is where you could get most problems.
Always ensure you buy good quality wiring, because you don’t want more sleeve than wire. There are some great amp wiring kits out there with all wires needed, so if you need the full bundle one of these is a good way to go.
Last but not least, always make sure you connect all wires with a good solid connection. Whether it’s crimp connectors or soldered connections, it’s up to you, but whichever way, make sure you test the connection with a few good tugs as you wire everything up.
If you have any questions and need more wire gauge guidance, leave a message in the chatbox below and we will get back to you.