Как подключить потолочные динамики к усилителю
Потолочные громкоговорители — отличный способ наполнить комнату объемной музыкой, не беспокоясь о переполнении помещения. Кроме того, добавление усилителя делает звучание еще более захватывающим. В этой статье мы обсудим, как подключить потолочные динамики к усилителю.
Как потолочные динамики подключаются к усилителю?
Потолочные громкоговорители традиционно разрабатывались для работы с усилителями, которые занимают только левый или правый каналы. Поэтому чаще всего покупают пару потолочных динамиков и подключают их к усилителю как стереопару.
Однако проводка пары потолочных громкоговорителей может быть непрактичной во всех случаях, особенно если вам необходимо установить потолочный громкоговоритель в небольшой комнате. Поэтому в таких случаях лучше всего подходят одиночные стереодинамики. Чтобы подключить одиночный потолочный стереодинамик к усилителю, вам понадобится два кабеля.
Какой акустический кабель следует использовать с потолочными громкоговорителями?
При подключении динамиков к усилителю очень важно выбрать правильный кабель для динамиков. Это связано с тем, что разные провода работают по-разному из-за разных уровней импеданса.
Двухжильные акустические кабели 16-го калибра обычно используются в качестве отраслевых стандартов для акустических систем. Однако это более эффективно, если необходимая длина кабеля составляет около 35 метров. Для более длинных участков важно рассмотреть возможность использования кабеля более высокого качества, поскольку звуковой сигнал быстро ухудшается, если кабель проходит слишком далеко.
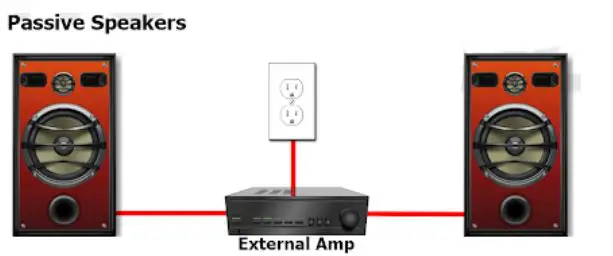
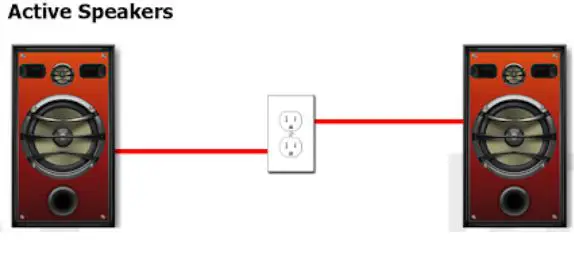
Но нужен ли усилитель для потолочных динамиков?
Потолочные динамики обычно пассивные (узнайте больше о пассивных и активных динамиках). Это означает, что им потребуется подключение к усилителю. С другой стороны, для активных потолочных динамиков усилитель не нужен, поскольку он уже встроен.
Однако предположим, что вы собираетесь подключить многоканальную систему объемного звучания к доступным потолочным динамикам.
В этом случае вам понадобится усилитель для более качественного вывода звука.
Если вы хотите узнать больше, ознакомьтесь с нашей статьей о том, нужен ли вам усилитель для потолочных динамиков.
Однако перед подключением вам необходимо учесть несколько факторов. Вот три ключевых фактора:
1. Позиция спикеров
Подключение потолочных динамиков будет намного проще, если они будут установлены в гостиной. Кроме того, расстояние от потолочных громкоговорителей до положения усилителя будет определяться положением, в котором громкоговорители были установлены на потолке.
2. Моно или одиночные потолочные стереодинамики?
Потолочные динамики традиционно предназначены для работы со стереоресиверами. Однако, если у вас ограниченное пространство и вы не можете подключить пару динамиков, вы будете использовать моноусилители.
3. Рейтинг спикеров
Другим фактором, который следует учитывать, является рейтинг спикеров. К ним относятся импеданс и номинальная мощность. Импеданс динамика очень важен для правильного согласования с усилителем.
Как подключить потолочные динамики к усилителю:шаг за шагом
Шаг 1. Соберите материалы
Подключить потолочные громкоговорители к усилителю очень просто. Однако для достижения этого соединения вам необходимо собрать правильные инструменты. Вот список того, что вам нужно:
- Усилитель
- Рыбная лента или голод шерсти
- Плоский бит
- Перчатки
- Уровень
- Пила для замочной скважины или гипсокартона
- Philips screwdriver
- Wire strippers
You can have your ceiling speakers wired to an amplifier by sound professionals. However, you can still have the connection through the DIY procedure. If you intend a DIY, take preventive measures such as turning off all mains powers and wearing protective gear for the hands, eye, and legs. 
Before routing the amplifier, you should plan the location to ensure it is well placed, stable, and secure. The location of the amplifier should be strategic for ease of control. Also, if you have a modern amplifier with remote control features such as Wi-Fi, Bluetooth, or Alexa, stationing the amplifier in proximity for ease of navigation by remote or voice is very important.
You should also measure the distance to the amp to establish the length of wire needed to connect the amp to the ceiling speakers. Remember, two runs of speaker wires will be required for stereo installation.
Step 2:Run The Wires
Once the distance and length of speaker wires are established, you can run the UL2 wire from the location of the amplifier to the area of the ceiling speakers.
Running the wires to the ceiling is much easier in new constructions. However, if you are dealing with an old building, you may need to drill holes through support beams to pass the wire to your preferred locations.
Once the wire is connected, leave behind an extra coil of wire at the point where the speakers are located.
Step 3:Prepare The Ceiling Speaker For Connection
Begin by cutting the drywall behind the point where you intend to connect the amp. Pull out the ceiling speakers from their brackets.
Locate the color-coded terminals and connect the red and black wires. Ensure that the colors on the cables are appropriately matched with the speaker terminals. Also, it would help if you secured the connections to avoid the wires coming out during the speaker operation.
Once the connection is secure, return the speakers safely and securely and seal the brackets back again. Ensure that the cables are firmly fixed. Once this is successful, seal the drywall and fill it in place.
Step 4:Run The Wires To The Amplifier
Once the red and black speaker wires are connected to the ceiling speakers, run them through the wall into the terminals of the amplifier. Considering the distance between the devices, you can choose to run the wires along the wall through the floor. Safely pass them under the carpet to ensure they remain safe on the floor.
Also, ensure that the colors are correctly matched.
Step 5:Test The Connection
Once all the devices are correctly connected, test that the amplifier can play music and output it through the ceiling speakers. If the speakers cannot produce sound, it is essential to troubleshoot the connection before sealing back the speakers.
Step 6:Seal And Paint
Once the ceiling speakers are appropriately wired to the amplifier, seal the spaces around them with tape. Additionally, you can paint the area to add more finishing touches for extra style. Besides, for additional glamor and blending with room décor, you paint the ceiling speakers so that they can seamlessly integrate with the wall and ceiling again.
Amplifier For Ceiling Speakers
Finding the right amplifier for ceiling speakers is quite a similar process to finding the right amp for a passive speaker. You will be looking for similar features but considering highly the impedance compatibility and power output.
Here are some of the top bets for your ceiling speakers.
1. Best Budget:Sony STR-DH790
- Compact
- 4 HDMI inputs and one HDMI ARC output
- 4k/60 Hz pass-through support
- Compatible with 6-16 ohm speakers
Плюсы
- Доступно
- 7 speaker terminals
- FM tuner
- Bluetooth connectivity
Минусы
- Lacks Wi-Fi
- Only 4 HDMI inputs
- No preamp outputs
2. Best Under $1000:Marantz SR5014
- 8 HDMI inputs and 2 HDMI out ports
- HDCP 2.3 compliant ports
- Additional features include Bluetooth connectivity and AM/FM tuners
Плюсы
- Comes with a calibration mic and a setup assistant
- Multiple digital/analog audio inputs
- 7 speaker terminals
- 2 subwoofer pre-outs
- Wi-Fi and Bluetooth connectivity
Минусы
- All the ports are still HDMI 2.0
What Do You Plug Ceiling Speakers Into?
An external amplifier should power all the ceiling speakers. Standard speaker cables make the connection.
Amplifier For Ceiling Speakers
- Best Budget:Sony STR-DH790
It is versatile, clean design, and is compact. The Sony STR-DH790 is classified as 7.2 and supports Dolby Atmos and DTS:X. You can therefore use it in the 5.1.2 configuration for two ceiling speakers.
Плюсы
- Доступно
- Fully-featured remote and mic available
- All HDMI inputs support 4K/60Hz pass-through
- Seven speaker terminals and two subwoofer pre-outs
- Minimum RMS output – 90W per channel
- Compatible with 6-16 ohm speakers.
- Bluetooth supported
Минусы
- Lacks Wi-Fi
- Only 4 HDMI inputs
- Not compatible with 4ohm speakers
- No preamp outputs.
Other amplifiers for ceiling speakers you can choose from include:
- Marantz SR5014
- Pyle PDA6BU.5
- Rockville RCS80-1
- Pyle Model:PWA15BT