Как установить автомобильную магнитолу | Простое руководство по замене головного устройства
Установка головного устройства или его замена могут быть сопряжены с трудностями. Лично я тратил всего 30 минут на замену головного устройства, вплоть до 4 или 5 часов на ту же работу на другой машине. Существует ряд переменных, которые могут определять, насколько сложной и трудоемкой является задача:
- Компоненты приборной панели и отделки салона. По нашему опыту, самые сложные автомобили, как правило, немецкие. Ауди, БМВ, Мерседес, Фольксваген. Компоненты приборной панели и отделки очень тугие и тугие, и их трудно снять.
- Электропроводка. Электропроводка может различаться в зависимости от автомобиля. Это действительно зависит от количества функций, которые есть у автомобиля. Например, OnStar на автомобилях GM или просто штатная стереосистема с усилителем. Это то, что вам нужно знать, прежде чем подключать проводку к машине и заказывать адаптирующие жгуты (скоро мы расскажем об этом подробнее).
- Установка нового головного устройства. Это может быть особенно сложно, если вы решите сделать все своими руками. Однако в большинстве случаев вы обнаружите, что существуют адаптирующиеся «наборы для приборной панели» от таких поставщиков, как Metra и Scosche, которые упрощают монтаж и установку стереосистемы.
В конце концов, есть автомобили, которые я бы рекомендовал обновить или заменить стереосистему, и автомобили, которые я бы не рекомендовал. В этом руководстве мы не только проведем вас через процесс принятия решения о том, следует ли вам модернизировать головное устройство вашего автомобиля, но и проведем вас через этот процесс, если вы решите это сделать!
Стоит ли обновлять головное устройство автомобильной стереосистемы?
Прежде чем купить и установить одну из рекомендованных нами лучших автомобильных стереосистем или GPS-навигаторов, вам необходимо задать себе следующие вопросы, чтобы определить, следует ли вам обновить или заменить вашу стереосистему и какую стереосистему вы должны установить на нее.
- Первый вопрос. Есть ли в вашем автомобиле штатное головное устройство? В этом случае ваша установка значительно упрощается, поскольку проводка и монтаж уже выполнены. Все, что вам нужно сделать, это заменить его. Обратите внимание, что вы можете заменить жгут проводов, который подключается к задней части устройства. В этом случае просто обрежьте и подберите провода по цвету.
- Приведет ли обновление моего головного устройства к потере каких-либо функций/функций моего автомобиля? Многие из новых автомобилей имеют взаимозависимые системы, основанные на стереосистеме. Например, у моего Ram 1500 есть настройки, реагирующие на звуковой сигнал, когда я его запираю, запираются ли замки автоматически по истечении определенного периода времени, остаются ли фары включенными после того, как я запираю грузовик. Все это управляется через заводское головное устройство. У многих автомобилей это есть. Если в вашем автомобиле есть такие функции, которые зависят от головного устройства, я бы рекомендовал оставить стандартную стереосистему. Если вам нужно больше звука, вы можете сделать это, не обновляя стереосистему.
- Есть ли в моем автомобиле несколько экранов? В некоторых случаях автомобили имеют несколько экранов, которые связаны между собой. Например, на многих автомобилях Honda есть головное устройство, а затем экран дисплея, на котором отображается информация с головного устройства, такая как радиостанция или компакт-диск. Замена стереосистемы может сделать дисплей бесполезным. Бывают случаи, когда были изготовлены адаптеры, и вам нужно выяснить, есть ли они, прежде чем вы решите заменить головное устройство. Или, если вам все равно, вперед!
- Почему я обновляю автомобильную стереосистему? Если вам нужен сабвуфер или более громкие динамики, головное устройство — не единственный вариант. Если вам нужны функции, которых у вас сейчас нет, например Bluetooth или вход AUX, для этого также есть адаптеры. Ключевым моментом является выяснение того, является ли замена стереосистемы лучшим вариантом для ваших нужд.
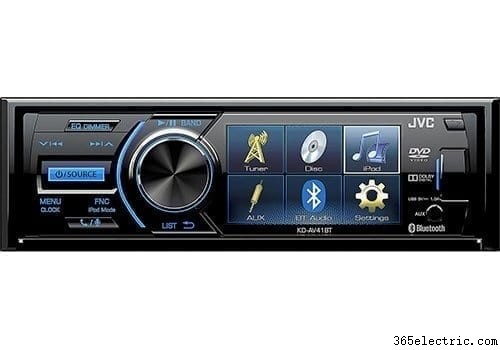
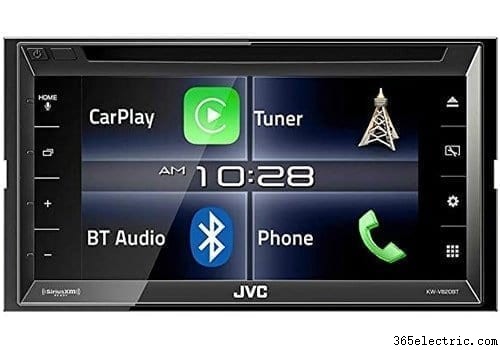
- Насколько велико мое стереоотверстие? Головные устройства бывают двух основных размеров:1DIN и 2DIN. 1DIN — меньший из двух. Подходит как для 1DIN, так и для 2DIN. 2DIN больше и обычно предназначен для устройств с сенсорным экраном и большими экранами. Вот пример того, как выглядят 1DIN (слева) и 2DIN (справа):
Если, задавая себе все эти вопросы, вы все же чувствуете необходимость купить и установить новое головное устройство, вот следующие шаги!
Рекомендуемые инструменты для установки автомобильной стереосистемы
- Набор крестообразных и плоских отверток
- Плоскогубцы
- Инструменты для зачистки проводов
- Гаечные ключи или головки (обычно 8 мм, 10 мм)
- Инструмент для извлечения тире
- Клавиша удаления стереозвука (при необходимости)
- Вольтметр
- Паяльник или горелка
- Припой
- Термоусадка или изолента.
- ИЛИ обжимки/зажимы для проводов (если вы не хотите паять)
1. Removing The Car Stereo
Well, the first step to installing your new head unit is to remove the old! To do this, we recommend you pop the hood and disconnect your battery before anything. This way, you don't short any fuses. Finding a blown fuse can be time consuming and frustrating so take our word that this will save you time in the long run. Once you have done this, start to remove the trim from around your stereo to access the mounting screws. I've found the trim removal instructions from Metra to be very helpful when you do this. In many cases, trim needs to be pulled in a certain direction to prevent cracking or breaking it. Metra does a great job at helping you visualize how to pull your trim off and where. Go to http://metraonline.com/, scroll down to the vehicle fit guide and enter your car. Once you've done this, click on one of the dash kits (this is the piece of plastic that you'll mount your head unit into. It replaces many parts of your trim to make a seamless fit for your new stereo). If you haven't already bought one of these dash kits, we HIGHLY recommend you do. It will simplify your install by 10 fold. Once you've selected one of the dash kits, click on the PDF link under the “Documents” on the left. You'll find full instructions for removing your trim step by step!
Your head unit will be mounted in one of two ways:
- Bolted to the dash with brackets and screws. This is the more difficult option to removing and where the Metra instructions will be extra helpful.
- Secured with mounting sleeve and spring clips. For this type, you'll want to purchase our recommended stereo removal keys.
Sticking and Stubborn Dash Trim
It's worth noting that removing trim is probably one of the more difficult tasks in removing your car stereo. You're going to be lucky if you don't hit at least one trim piece that isn't a pain. In these cases, you really want to use a trim removal tool to wedge in between the gaps and gently work your way around the trim piece. Patience is key because once you break a trim piece, there's no turning back. Start in a corner and work your way around the piece.
Once you've removed your trim according to the instructions, dismount your factory stereo and disconnect the wiring on the back of the unit.
2. Wiring Your New Car Stereo
If Metra or Scosche carries a wire harness for your vehicle, we highly recommend purchasing one along side the dash kit. Again, you can use the same link from Metra (www.metraonline.com) to find the one for your vehicle. In the case that you can't find one, you'll need to do a little research on the web to find a list of stereo wire colors on your harness and match them up with the corresponding ones on the car stereo harness. You can find a diagram here of aftermarket car stereo wires. This will help you match the aftermarket up with your factory ones.
If you find that there is a custom wire harness for your car, it's very simple, just match up color for color the wires from your aftermarket head unit harness to your custom wire harness for your car.
Connecting the Wires
There's two options for connecting the wires that you can use:
- Soldering – For all of the professional installs that I have done I would solder the two together. This ensures a permanent connection that will never short over time. It's more time consuming though. Here's how you do it:
- Strip the two wires 1/2 inch back.
- (Optional) Place 1 1/2 inch of shrink wrap on one side at least 4 inches behind the end of the wire.
- Overlap the two exposed wires and twist the two together until they are interconnected.
- Using a soldering iron or a soldering torch, heat the wire and feed in your solder slowly until it absorbs into the wire.
- Let cool and test the solder job by tugging on the two wires.
- After the wires cool, move your shrink wrap back over the soldered area. If you didn't use shrink wrap, apply electrical tape.
- Do this for each wire until all have been connected.
- Connectors – You can use butt connectors or crimp caps as well. This is a much more efficient way to connect the wires but in many cases I've seen these fail after a few years on the road. In any case, you'll either crimp the two wires together in a clamp by placing the wires in and clamping down on the crimp clam. Or your use but connectors to insert both ends into the connector and clamp both sides.
3. How to Install the New Stereo
Now that your wires are all completed you're ready to install the head unit. Connect all of the wires first. Ensure that there are no exposed wires that may be in contact with any part of the vehicle. We recommend connecting your battery and testing the stereo out prior to fully installing it back into the dash.
Once you've tested it (and it works!) you'll want to add the mounting brackets to your new head unit. If you have a dash kit, use the ones that come with the kit. If not, use the ones off of your factory stereo. If you have the dash and mounting kit, follow the instructions in the manual. If not, you'll need to test where the new head unit sits, and adjust your factory trim to make it fit. This is normally a difficult task. I'd recommend using a Dremel to make cuts and adjustments to the plastic.
Slide the stereo into the opening in the dash, ensuring that the wires behind are tucked and not pinched. Sometimes this may take a few times when the vehicle has a tight dash opening. Tuck the wires back into an opening behind the unit.
Поздравляем! Готово! Let us know you you did and if you have any questions in the comments section.
Also be sure to check out our top rated lists:
Best Single Din Car Stereo
Best In-Dash GPS Navigation Unit
Best DVD/Multimedia Head Unit
Best Digital Media Receiver